Tag Archives: neural network

Is the deconvolution layer the same as a convolutional layer?

Isn’t this an interesting topic? If you have worked with image classification problems( e.g. classifying cats and dogs) or image generation problems( e.g. GANs, autoencoders), surely you have encountered with convolution and deconvolution layer. But what if someone says a deconvolution layer is same as a convolution layer.

This paper has proposed an efficient subpixel convolution layer which works same as a deconvolution layer. To understand this, lets first understand convolution layer , transposed convolution layer and sub pixel convolution layer.

Convolution Layer

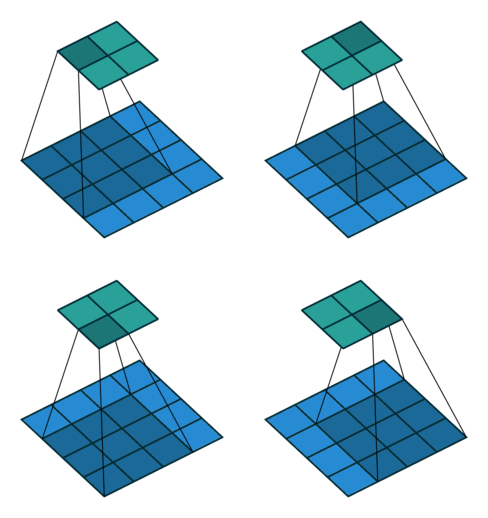
In every convolution neural network, convolution layer is the most important part. A convolution layer is consist of numbers of independent filters which convolve independently with input and produce output for the next layer. Let’s see how a filter convolve with the input.

Transposed and sub pixel Convolution Layer

Transposed convolution is the inverse operation of convolution. In convolution layer, you try to extract useful features from input while in transposed convolution, you try to add some useful features to upscale an image. Transposed convolution has learnable features which are learnt using backpropogation. Lets see how to do a transposed convolution visually.

Similarly, a subpixel convolution is also used for upsampling an image. It uses fractional strides( input is padded with in-between zero pixels) to an input and outputs an upsampled image. Let’s see visually.

An efficient sub pixel convolution Layer

In this paper authors have proposed that upsampling using deconvolution layer isn’t really necessary. So they came up with this Idea. Instead of putting in between zero pixels in the input image, they do more convolution in lower resolution image and then apply periodic shuffling to produce an upscaled image.

Source
r denotes the up scaling ratio

Authors have illustrated that deconvolution layer with kernel size of (o, i, k*r , k*r ) is same as convolution layer with kernel size of (o*r *r, i, k, k) e.g. (output channels, input channels, kernel width, kernel height) in LR space. Let’s take an example of proposed efficient subpixel convolution layer.

Source

In the above figure, input image shape is (1, 4, 4) and upscaling ratio(r) is 2. To achieve an image of size (1, 8, 8), first input image is applied with kernel size of (4, 1, 2, 2) which produces output of shape (4, 4, 4) and then periodic shufling is applied to get required upscaled image of shape (1, 8, 8). So instead of using deconvolution layer with kernel size of (1, 1, 4, 4) same can be done with this efficient sub pixel convolution layer.

Implementation

I have also implemented an autoencoder(using MNIST dataset) with efficient subpixel convolution layer. Let’s see the code for efficient subpixel convolution.

The above periodic shuffling code is given by this github link. Then applied autoencoder layers to generate image. To up-sample image in decoder layers first convolved encoded images then used periodical shuffling.

This type of subpixel convolution layers can be very helpful in problems like image generation( autoencoders, GANs), image enhancement(super resolution). Also there is more to find out what can this efficient subpixel convolution layer offers.

Now, you might have got some feeling about efficient subpixel convolution layer. Hope you enjoy reading.

If you have any doubt/suggestion please feel free to ask and I will do my best to help or improve myself. Good-bye until next time.

Referenced Research Paper : Is the deconvolution layer the same as a convolutional layer?

Referenced Gitub Link : Subpixel
On Calibration of Modern Neural Networks

Nowadays neural networks are having vast applicability and these are trusted to make complex decisions in applications such as, medical diagnosis, speech recognition, object recognition and optical character recognition. Due to more and more research in deep learning, neural networks accuracy has been improved dramatically.

With the improvement in accuracy, neural network should also be confident in saying when they are likely to be incorrect. As an example, if confidence given by a neural network for disease diagnosis is low, control should be passed to human doctors.

Now what is confidence score in neural network? It is the probability estimate produced by the neural network. Let say, you are working on a multi-class classification task. After applying softmax layer you found out that a particular class is having highest probability with value of 0.7 . It means that you are 70% confident that this should be your actual output.

Here we intuitively mean that, for 100 predictions if average confidence score is 0.8, 80 should be correctly classified. But modern neural networks are poorly calibrated. As you can see in figure there is larger gap between average confidence score and accuracy for ResNet while less for LeNet.

Source

In the paper, author has addresses the followings:

  1. What methods are alleviating poor calibration problem in neural networks.
  2. A simple and straightforward solution to reduce this problem.

Observing Miscalibration:

With the advancement in deep neural networks some recent changes are responsible for miscalibration. 

  1. Model Capacity:  Although increasing depth and width of neural networks may reduce classification error, but in paper they have observed that these increases negatively affect model calibration.
  2. Batch Normalization: Batch Normalization improves training time, reduces the need for additional regularization, and can in some cases improve the accuracy of networks. It has been observed that models trained with Batch Normalization tend to be more miscalibrated.
  3. Weight Decay: It has been found that that training with less weight decay has a negative impact on calibration.

Temperature Scaling:

Temperature scaling works well to calibrate computer vision models. It is a simplest extension of Platt scaling. To understand temprature scaling we will first see Platt scaling.

Platt Scaling: This method is used for calibrating models. It uses logistic regression to return the calibrated probabilities of a model. Let say you are working on a multi-class classification task and trained it on some training data. Now Platt scaling will take logits(output from trained network before applying softmax layer using validation dataset) as input to logistic regression model. Then Platt scaling will be trained on validation dataset and learns scalar parameters a, b ∈ R and outputs q = σ(az + b) as the calibrated probability(where z are logits.).

Temperature scaling is an extension of Platt scaling having a trainable single parameter T>0 for all classes. T is called the temperature. T is trained with validation dataset not on training dataset. Because if we train T during training, network would learn to make the temperature as low as possible so that it can be very confident on training dataset.

Then temperature will be applied directly to softmax layer by dividing logits with T ( z/T ) and then trained on validation dataset. After adjusting temperature parameter on validation dataset, it will give trained parameter T, which we can use to divide logits and then apply softmax layer to find calibrated probabilities during test data. Now, lets see a simple TensorFlow code to implement temperature scaling.

Simple techniques can effectively remedy the miscalibration phenomenon in neural networks. Temperature scaling is the simplest, fastest, and most straightforward of the methods,and surprisingly is often the most effective. 

Referenced Research Paper : On Calibration of Modern Neural Networks   

GitHub: Temperature Scaling  

Hope you enjoy reading.

If you have any doubt/suggestion please feel free to ask and I will do my best to help or improve myself. Good-bye until next time.

Denoising Autoencoders

In my previous blog, we have discussed what is an autoencoder, its applications and a simple implementation in keras. In this blog, we will see a variant of autoencoder – ‘ denoising autoencoders ‘.

A denoising autoencoder is an extension of autoencoders. An autoencoder tries to learn identity function( output equals to input ), which makes it risking to not learn useful feature. One method to overcome this problem is to use denoising autoencoders.

For training a denoising autoencoder, we need to use noisy input data. For that, we need to add some noise to an original image. The amount of corrupting data depends on the amount of information present in data. Usually, 25-30 % data is being corrupted. This can be higher if your data contains less information. Let see how you can add noise to data in code:

To calculate loss, the output of the denoising autoencoder is then compared to original input instead of the corrupted one. Such a loss function train model to learn interesting features rather than learning identity function.

I have implemented denoising autoencoder in keras using MNIST data, which will give you an overview, how a denoising autoencoder works.

following is the result of denoising autoencoder.

The full code can be find here.

Hope you understand the usefulness of denoising autoencoder. In the next blog, we will feature variational autoencoders. Hope you enjoy reading.

If you have any doubt/suggestion please feel free to ask and I will do my best to help or improve myself. Good-bye until next time.

Autoencoders

Let’s start with a simple definition of autoencoders. ‘ Autoencoders are the neural networks trained to reconstruct their original input’.

Now, you might be thinking what’s the use of reconstructing same data. Let me give you an example If you want to transfer data of GB’s of size and somehow if you can compress it into MB’s and then able to reconstruct back the data to the original size, isn’t that a better way to transfer data. This is one of the applications of autoencoders.

Autoencoders generally consists of two parts, one is encoder and other is decoder. Encoder downscale data to less number of features and decoder upscale the extracted features to original one.

There are some practical applications of autoencoders:

  1. Dimensionality reduction for data visualization
  2. Image Denoising
  3. Generative Models

Visualizing a 10-dimensional vector is difficult. To overcome this problem we need to reduce that 10-dimensional vector into 2-D or 3-D. One of the famous algorithm PCA (Principal Component Analysis) tries to solve this problem. PCA uses linear transformations while autoencoders can use both linear and non-linear transformations for dimensionality reduction. Which makes autoencoders to generate more complex and interesting features than PCA.

Autoencoders can be used to remove the noise present in the image. It can also be used to generate new images required for a specific task. We will see more about these two applications in the next blog.

Now, let’s start with the simple implementation of autoencoders in Keras using MNIST data. First, let’s download MNIST training and test data and reshape it.

Encoder

MNIST data consists of images of digits. So, it is better to use a convolutional neural network in our encoders and decoders. In our encoder, I have used conv and max-pooling layers to extract the compressed representation. Then flatten the encoder output to 32 features. Which will be the input to the decoder.

Decoder

In the decoder, we need to upsample the extracted 32 features into the original size of the image. To achieve this, I have used Conv2DTranspose functions from keras. Then the final layer of the decoder will give the reconstructed output which will be similar to the original input.

To minimize reconstruction loss, we train the network with a large dataset and update weights. Now, our model is created, the next thing is to compile and train the model.

Below are the results from autoencoder trained above. The first line of digits shows the original input (test images) while the second line represents the reconstructed inputs from the model.

The full code can be find here.

Hope you understand the basics of autoencoders, where these can be used and how a simple autoencoder be implemented. In the next blog, we will see how to denoise an image using autoencoders. Hope you enjoy reading.

If you have any doubt/suggestion please feel free to ask and I will do my best to help or improve myself. Good-bye until next time.

Referenced Research Paper: http://proceedings.mlr.press/v27/baldi12a/baldi12a.pdf

Genetic Algorithm and its usage in neural network

You might have heard about the theory of evolution by natural selection. If not then read this quote by Charles Darwin ” It is not the strongest of the species that survives, nor the most intelligent; it is the one most adaptable to change. ” Genetic Algorithm is also based on this theory.

In the 1970’s, Jon Holland tries to mimic some processes observed in natural evolution by introducing genetic algorithm. This algorithm can be used in optimization and search problems both.

A typical genetic algorithm requires some population in the solution domain and a fitness function to find the fittest individual. To evolve individuals in the population genetic algorithm uses some operations like crossover, mutation, and selection.

Genetic algorithm starts with some random initial population. Then tries to produce offspring from the best individuals in the population. The concept is that, if the fittest individuals are selected then chances of producing a better offspring is more. This process keeps on iteration until your target is not achieved. Each iteration is known as the generation.

Initial Population

Initial Population refers to a set of possible solutions. Each member (individual) of the population is usually known as the chromosome (phenotypes) and represents a solution for the problem to be investigated. The chromosome is represented as a set of parameters (features or genes or weights) that defines the individual. Size of the population depends totally on your problem. Random selection of initial population makes sure that it covers a wide range of possible solution.

Evaluation and Fitness Function

Now, we have a random initial population, next thing is to evaluate the fitness of these individuals. To evaluate the fitness of these individuals, you need to define some fitness function. You need to choose the fitness function according to your problem. Fitness function measures the quality of each individual.

Selection

Some best individuals are selected from the evaluated population. These selected individuals are mated to produce some new offspring.

Crossover

Each individual selected in the previous step has some quality. Our objective is to produce better offspring so that our algorithm can evolve and find a better solution to the problem. To do that two individuals from the best population are selected and a new child (offspring) is produced with features of both as shown above. This is known as Crossover.

Mutation

Mutation is applied to maintain the diversity within the population and inhibit premature convergence. With some low probability, a portion of the new individual is subjected to mutation as shown in the figure above.

Replacement

New population replaces a previous one for the next generation. This process keeps on iterating until a certain target is not achieved.

Application of genetic algorithm in neural networks:

  1. Training of a neural network ( instead of using gradient descent, Adam etc.)
  2. Selection of neural network architecture ( Hyperparameters selection)

Now, you might have got some feeling about the genetic algorithm. In the next blog, we will see how this concept can be applied to train the neural network to play a snake game. Hope you enjoy reading.

If you have any doubt/suggestion please feel free to ask and I will do my best to help or improve myself. Good-bye until next time.

Neural Network Architecture Selection Using Genetic Algorithm

In the previous blog, I have discussed the genetic algorithm and one of its application in the neural network (Training a neural network with a genetic algorithm ). In this blog, I have used a genetic algorithm to solve the problem of neural network architecture search.

You can find full code here.

Genetic Algorithm is really helpful if you do not want to waste your time in using brute force trial and error method for selecting hyperparameters. To know more about the genetic algorithm you can read this blog.

In this tutorial, to demonstrate the use of genetic algorithm I have used Snake Game with Deep Learning where it’s been difficult to find out which neural network architecture will give us the best results. So, the genetic algorithm can be used to find out the best network architecture among the number of hyperparameters.

Different values of hyperparameters are used to create an initial population. I have used the following parameters in the genetic algorithm to find the best value for them.

  1.  Number of hidden Layers.
  2.  Units per hidden layer
  3.  Activation function
  4.  Network optimizer

Creating Initial Population

Random parameters are used to create the Initial population. For creating the population first, you have to decide population size. Each individual in the population will have four values.

I have taken 20 chromosomes in the population.

Fitness Function

Fitness function can vary as per the need of different genetic algorithms. Here, I have used the average score for different network architectures. Individuals with the highest average score are fittest ones.

Selection

After evaluating each individual in the population, I have selected top 5 fittest individuals from the population.  And also selected 3 individuals from the non-top performers. This will keep us away from getting stuck in the local maximum.

Remaining 12 individuals are created from these 8 individuals using Crossover.

Crossover and Mutation

To produce better offspring for the next generation, I have selected two parents randomly from the 8 individuals selected above and generated other 12 individuals.

In certain new children formed, some of their genes can be subjected to a mutation with a low random probability. Mutation is required to maintain some amount of randomness in the genetic algorithm.

Now we have created all the necessary functions required for a genetic algorithm. Now, we  define a model function using keras library. Then we will train this model with different hyperparameters and search for the best using genetic algorithm.

Here, I have used 10 generations and 20 individuals in the population. It can vary according to your need.

Now, you might have got some feeling about how the genetic algorithm can be applied to find neural architecture instead of using the brute-force method. Hope you enjoy reading.

If you have any doubt/suggestion please feel free to ask and I will do my best to help or improve myself. Good-bye until next time.

Snake Game with Deep Learning

Developing a neural network to play a snake game usually consists of three steps.

  1. Training data generation
  2. Training neural network
  3. Testing

The full code can be found here

In this tutorial, I will guide you to generate training data. To do this, first, we need to develop a snake game for which you can follow this blog.

Training data consists of inputs and corresponding outputs. Here, I have used the following inputs and outputs.

Input is comprised of 7 nodes:

  1. Is left blocked or is there any obstacle in left ( 1 or 0)
  2. is front blocked or is there any obstacle in front (1 or 0)
  3. Is right blocked  or is there any obstacle in right(1 or 0)
  4. Apple direction vector from snake (X)
  5. Apple direction vector from snake (Y)
  6. Snake’s current direction vector (X)
  7. Snake’s current direction vector (Y)

our input data will look like this:

The output is comprised of 3 node:

  1.  [1,0,0] will move snake left
  2.  [0,1,0] will continue snake in same direction
  3.  [0,0,1] will move snake right

Now the big question, how to generate this data? You can sit and play as many games as you can, but it is always good when you can generate data automatically. Let’s see how to do this.

Generating Training Data

Here I have generated training data automatically. To do this I have used angle between snake and apple. On the basis of that angle, I have decided in which direction snake should move. First, let’s calculate these.

Calculating angle b/w snake and apple:

To calculate the angle between snake and apple we only require two parameters, snake position and apple position.

In the following code, I have first calculated the snake’s current direction vector and Apple’s direction from the snake’s current position. Snake direction vector can be calculated by simply subtracting 0th index of the snake’s list from the 1st index. And to calculate apple direction from the snake, just subtract 0th index of snake’s list from Apple’s position.

Then normalize these direction vectors and calculate the angle with the help of the math library. The code is as follows:

After calculating the angle, next thing is to decide in which direction snake should move.

Calculating direction according to the angle:

If above-calculated angle > 0, this means Apple is on the right side of the snake. So snake should move to the right. For  < 0, move left and =0 means continue in same direction. I have used 1, – 1 and 0 for the right, left and front respectively.

I have used the following steps to get the correct button direction (up, down, right, left or 3, 2, 1, 0 respectively) for the next step of the snake.

  1. First, I have calculated the snake’s current direction.
  2. Then to turn the snake to the left or right direction, I have calculated left direction vector or right direction vector from snake’s current direction vector.
  3. Then I have converted the above-calculated direction vector into the button direction.

Now, for every step, angle and corresponding next direction are calculated and snake moves according to that. And for each step inputs and outputs are calculated which are appended to a list of training data.To generate training data, we need to keep a record of 7 inputs and 3 outputs for every step the snake takes. First, let’s see how I have calculated the inputs for every step the snake takes.

  1. To check if the direction is blocked, we look one step ahead in each direction.
  2. Snake direction vector = Snake’s Head (0th index) – Snake’s 1st index
  3. Apple direction from the snake = Apple’s position – Snake’s head position (See the figure below)

For every step, the output is generated by first calculating the direction for the given snake and apple position, using angle between them. Now, we need to convert our directions( -1, 0 or 1 ) to output(Y), a one hot vector. For every predicted direction we need to see that if that direction is blocked or not and according to that create output (Y) for training data. The code given below seems to be a bit longer but it calculates our training data output (Y).

Here, I have used 1000 games for generating training data, each of which consists of 2000 steps. For every game, I have re-initialized snake position, apple position, and score. Then, created two empty lists, one for input training data(X) and another output training data(Y), those will contain our whole training data.The code is as follows:

You might have got some feeling about the training data generation for the snake game with deep learning. In the next blog, we will use this data to train and test our neural network. Hope you enjoy reading.

If you have any doubt/suggestion please feel free to ask and I will do my best to help or improve myself. Good-bye until next time.

Snake Game with Deep Learning Part-2

This is the second part of the snake game with deep learning series. In my previous blog, we have seen that how to generate training data for the neural network. In this tutorial, we will see training and testing of the neural network from generated training data.

The full code can be found here.

Our neural network is comprised of 7 nodes in the input layer, 3 node in the final layer and some hidden layers.

Network Architecture:

Now, it’s time to choose hidden layers and corresponding hyperparameters. Its always been difficult to find the perfect neural network architecture. There are some algorithms that can help to find the best network architecture for a neural network like a genetic algorithm, NAS, autoML etc. I have explained neural architecture search using the genetic algorithm in this blog.

In this blog, I have used hit and trial method to find network architecture. After some hit and trials, I have found a workable architecture, which consists of 2 hidden layers one of 9 units and other of 15 units. For the hidden layer, I have used the non-linear function ‘relu’ and for the output layer, I have used ‘softmax’.

You can use different libraries to train this model like keras, tflearn, etc. Here I have used keras. Our network architecture is as follows:

Train Neural Network

Our model is prepared, now it’s time to train this. For training, we first need to compile this model then call a method model.fit() which will do the rest. Since our training data is a list, we first need to change it into numpy array and then reshape it. The reason for this is, a sequential model from keras expects numpy array or sparse matrix of shape [n_samples,n_features].

Now, our model is trained with generated training data. Next thing is to test it and see how much is learned. 

Test Snake Game

Now it’s time to test our trained snake. To predict the direction we have fed our model with input values. Then used the predicted direction(Left, Straight or Front) to take the next step in our test games. For the new position, again predict the direction and move the snake. This continues until the snake dies or steps are over.

At last, we have calculated the maximum and average score for all the games in our test set.

Now let see how neural network plays snake game.

Summary

I have used 1000 training games and 2000 steps per game. From this, I have generated 1633235 training examples. Then I have tested it on 1000 games and 2000 steps per game. Got the highest score of 61 and got an average score of 23.091. This score can vary since we are using random positions for food and also no of steps are fixed. You can also vary your clock speed as per your need.
You can try with the different number of games but then you have to change your network architecture in order to prevent the model from biasing and overfitting.

Now you might have got some feeling about how neural network plays a snake game. In the next blog, we will use a neural network trained with a genetic algorithm to play snake game. Hope you enjoy reading.

If you have any doubt/suggestion please feel free to ask and I will do my best to help or improve myself. Good-bye until next time.